You want your wheels to sit flush, clear big brakes, or fix the stance without buying new rims. The question is simple: are two-piece wheel spacers safe? Mechanically, yes-when the parts are engineered right, installed right, and maintained. There’s a big catch if you’re in Australia: most states ban spacers on public roads unless they’re factory-fitted or individually engineered and approved. I live in Adelaide, and on-road use here is basically a no. So I’ll give you two answers at once-how to do this safely for track or off-road use, and how the rules land for daily driving in 2025.
- TL;DR: Two-piece (bolt-on) spacers can be mechanically safe if they’re hub-centric, use high-grade studs, are torqued correctly, and are checked often.
- Australia: On public roads in SA, NSW, VIC, QLD and most states, spacers/adapters are generally not legal unless OEM or individually engineered (see VSB 14, Section LS).
- Choose quality: Look for TÜV-tested units, 6061-T6/7075-T6 aluminium, and 10.9/12.9 studs. Avoid lug-centric or mixed-metal junk.
- Install basics: Clean hub, ensure hub-centric fit, use correct torque, medium-strength thread locker on spacer-to-hub bolts, and re-torque after 50-100 km.
- Heuristic: For every 10 mm of extra track per side, expect a noticeable bump in bearing and suspension loads. Keep thickness as low as possible.
What actually makes two-piece spacers safe or risky?
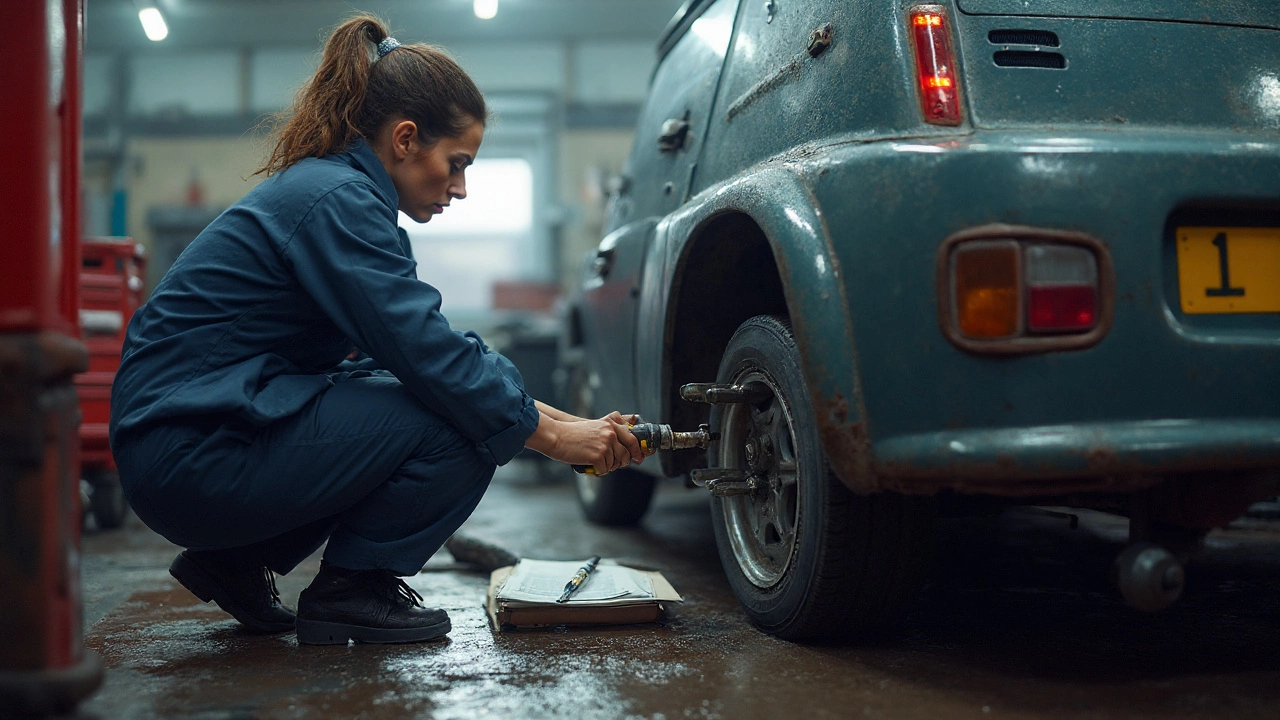
First, quick definitions. A two-piece (bolt-on) spacer bolts to your vehicle’s hub using the factory studs. The spacer has its own pressed-in studs that your wheel bolts onto. That’s different to slip-on spacers, which slide over your studs and require longer studs or extended nuts. Two-piece spacers spread the load better, and when they’re hub-centric, they locate on the hub spigot just like a wheel does. That hub-centric fit is non-negotiable if you care about safety and smoothness.
Construction and materials matter. Good spacers are CNC’d from 6061-T6 or 7075-T6 aluminium-light, strong, and stable with heat cycling. The studs should be property class 10.9 or 12.9 steel (ISO 898-1). Nuts should match the OE seat type (tapered/conical vs ball) and thread pitch. When a maker shows TÜV certification (common on reputable European brands), that’s a solid signal they’ve been fatigue-tested and dimensionally verified.
How do these fail? Three ways show up again and again:
- Loss of clamp load from poor torque or dirty mating surfaces. The spacer loosens, frets, and then studs snap one by one.
- Poor fit: lug-centric or off-centre bores cause vibration, which beats up studs and hubs. A sloppy bore can also chew the hub spigot.
- Bad hardware: soft studs, cheap nuts, or mixed metals that gall. Add heat from braking and things go downhill fast.
Does widening the track stress bearings? Yes, a bit. Any extra offset increases the bending moment on the hub and bearing. As a rule of thumb, 10-12 mm per side is usually fine on modern cars with healthy bearings; go 20-25 mm and you’re into the zone where bearing life and ball joint loads can be measurably affected, especially with heavy wheels and tyres. If you already run big rubber, pothole-prone roads, or you push hard on twisty hills, keep thickness minimal.
Standards and guidance I trust: studs should meet ISO 898-1 (10.9 or higher), wheels should be compliant to SAE J2530 (for aftermarket wheel structural performance), and the best spacers carry TÜV test markings. For installation, most reputable makers call for dry, clean threads on wheel nuts (no grease), a star-pattern torque with a calibrated wrench, and a re-torque after the first heat cycles.
One more thing nobody loves to hear: on-road legality in Australia. VSB 14 (National Code of Practice, Section LS) and state-level rules say spacers/adapters are not permitted on light vehicles unless they’re part of the vehicle’s original equipment or you have an engineer’s certificate. South Australia is aligned with that. So even if your setup is mechanically sound, it may be defectable and may impact insurance if you drive it on public roads.
| Spacer type | How it mounts | Best use | Key pros | Key risks | AU road-legal (2025) |
|---|---|---|---|---|---|
| Two-piece (bolt-on) | Bolts to hub, wheel bolts to spacer studs | Track/closed course; off-road; show | Better load path, easier stud engagement | Wrong torque or cheap studs = failures | No, unless OEM or individually engineered |
| Slip-on (one-piece) | Slides over OE studs; requires longer studs | Small thickness (3-8 mm) clearance fixes | Lightweight, simple | Stud length often insufficient; lug-centric risk | No, unless OEM or engineered |
| Wheel adapters (bolt-pattern change) | Like bolt-on spacers but change PCD/centre bore | Special fitment needs | Makes uncommon wheel fitment possible | Highest legal and mechanical scrutiny | No, unless engineered and approved |
If you’re only here for safety and you track your car, the answer is: good two-piece spacers are fine when kept tight and true. If you’re thinking daily driving on Aussie roads, the legal answer is the blocker, not the engineering.
How to choose and set them up the right way
If you’re setting these up for track, off-road, or private property, this is the short, clean path to a reliable installation.
- Measure correctly
- Hub bore: Use calipers to measure the hub spigot. Your spacer’s centre bore must match exactly.
- Wheel bore: If your wheels have a larger bore than the hub, use hub-centric rings between spacer and wheel.
- Studs and pitch: Confirm M12x1.5, M12x1.25, M14x1.5, or whatever your car uses. Wrong pitch destroys studs fast.
- Required thickness: Mock up with washers or measure brake/caliper clearance. Choose the thinnest spacer that fixes the problem.
- Buy only what’s engineered
- Material: 6061-T6 or 7075-T6 aluminium spacer bodies.
- Studs: ISO 898-1 property class 10.9 or 12.9. Heat-treated. Reputable brand hardware.
- Certification: TÜV-tested is a good filter; avoid no-name kits with vague specs.
- Design: Hub-centric lip that matches your wheel centre bore; full-face contact to the hub.
- Prep matters
- Clean the hub face until it’s shiny. Remove rust, paint, and dirt. A raised flake can cause runout and loosening.
- Check hub runout with a dial indicator if you can; even 0.1 mm of runout can show as vibration at highway speeds.
- Dry-fit the spacer: it should seat fully without rocking. If it sticks, fix burrs-not with force, with a deburring tool.
- Install the spacer to the hub
- Use medium-strength thread locker (e.g., Loctite 243) on the spacer-to-hub nuts/bolts if the kit specifies it. Do not oil those threads unless instructions say so.
- Torque in a star pattern. Typical values: M12x1.5 studs ~100-120 Nm; M14x1.5 ~130-150 Nm. Follow your kit’s spec if provided.
- Spin the hub and eyeball runout. It should look dead true.
- Mount the wheel to the spacer
- Ensure the wheel seats on the spacer’s hub lip, not the nuts. If it’s lug-centric, vibration is likely.
- Use the correct-seat nuts (taper vs ball). Wrong seats kill clamp load.
- Torque in a star pattern to the vehicle’s factory spec (often 110 Nm for M12, 140 Nm for M14, but check your model).
- Thread engagement check
- Rule: the nut should cover threads at least equal to the stud’s diameter. On M12, you want ~12 mm engagement (~8 full turns on 1.5 pitch). On M14x1.5, aim for ~9-10 turns.
- Re-torque and inspect
- Re-torque after 50-100 km of heat cycles, then at every fuel filter change or after any wheel off/on.
- Look for witness marks: black dust around nuts, shiny arcs, or any play when you try to rock the wheel at 3 and 9 o’clock.
A quick note on chemicals: use anti-seize only on the hub spigot if you live in a salty environment and you’re fighting corrosion. Keep it away from threads, because lubricated threads change torque-to-clamp force and can over-stress studs. Wheel nuts should be clean and dry unless the manufacturer says otherwise.
Torque cheat sheet (typical, always confirm your vehicle):
- M12x1.5 wheel nuts: 100-120 Nm (many cars 110 Nm)
- M14x1.5 wheel nuts: 130-150 Nm (many cars 140 Nm)
- Spacer-to-hub fasteners: follow the kit, common range 95-120 Nm for M12, 120-150 Nm for M14
What about wheel balance and alignment? If you add track width, check toe afterwards. Small thickness usually won’t change static camber much, but toe can drift if you’ve bumped parts or shifted tolerances. Also, re-balance if you felt any vibration-the spacer may have highlighted a wheel that was slightly out.
Real-world scenarios, trade-offs, and examples
Use cases are where this gets practical. Here’s how I think about it in Adelaide and around SA in 2025.
- Daily-driven street car (Aussie roads): Mechanically fine if you buy right and install right. Legally risky. Police can defect the car, and insurers may deny claims if a non-compliant spacer contributed. If you want a flush look that passes muster, buy wheels with a legal offset or get an engineering sign-off if your state allows it.
- Track-only car: This is where two-piece shines. You can dial brake clearance and track width. Keep thickness minimal-often 10-15 mm does the job to clear Brembos. Log torques in your pit book; re-torque hot between sessions if you’ve had issues.
- 4x4/touring: People use them to clear upper control arms or stop inside rub. But heavy tyres plus corrugations hammer studs. If you must, pick bolt-on hub-centric with top-tier hardware and inspect at every service. Again-check your state rules if you plan any public road use.
- EVs (Model 3/Y, Ioniq 5, etc.): Heavier wheel loads and higher regen braking heat. Keep spacer thickness minimal and stick to brand-name kits. Torque drift can be more noticeable as wheels heat-soak.
Example 1: Hot hatch with big brakes. You’ve fitted four-pot calipers and the inner wheel barrel kisses the caliper by 4 mm. A 5 mm slip-on could work, but you lack stud length. A 10 mm two-piece hub-centric spacer clears it and keeps full thread engagement on spacer studs. You re-torque at 100 km and after your first track day-no vibration, no drama.
Example 2: Dual-cab ute on 33s. Inside rub at full lock by the UCA. You’re tempted by 25 mm spacers. That’s right where bearing loads and scrub radius get spicy, and in SA it’s a no on-road. Safer fix: wheels with 10-15 mm less positive offset that sit within your allowable track increase once you check Section LS of VSB 14. You get the stance, stay legal, and reduce leverage on the bearings.
Example 3: Show car. It only trails to meets. You can run 15-20 mm bolt-ons to nail fitment, but treat them like brake parts-torque logged, spotless mating faces, and replacement hardware on a schedule (for track, many replace studs each season; for a show car that’s moved rarely, inspect each time you swap wheels).
What’s the real trade-off? Spacers are a shortcut to fitment. Wheels with the correct offset are the clean solution for road cars. Spacers make sense when you’re solving a specific clearance issue or you’re operating in a space where legality isn’t a factor (track/private property). If you insist on using them on-road in Australia, speak to an authorised vehicle engineer and your insurer first. Don’t guess.
Engineering footnotes for the curious:
- Stud stretch is what holds wheels, not friction alone. Correct torque sets the correct stretch (clamp load). Over-torque can neck the stud; under-torque lets parts fret and loosen.
- Mixed concentricity kills smoothness. Hub-centric fit ensures the wheel’s centre matches the hub. Lug-centric setups rely on nut seats to centre, which is less precise and prone to vibration.
- Heat cycles matter. After a spirited drive or track session, clamp load can drop a bit as surfaces settle. That’s why the first re-torque matters.
Checklists, FAQ, and what to do next
Here’s the fast way to make good decisions and stay out of trouble.
Pre-buy checklist:
- Confirm legality for your use-case (VSB 14, Section LS; state regs; insurance terms).
- Measure hub bore, wheel bore, PCD, thread pitch, and needed thickness.
- Choose hub-centric two-piece bolt-ons from a brand that publishes material and stud specs (6061/7075, ISO 898-1 10.9/12.9, TÜV).
- Verify seat type (taper/ball) matches your wheels.
- Plan for re-torque and inspection intervals.
Install checklist:
- Clean hub face and spigot to shiny metal.
- Dry-fit to confirm the spacer sits flush and concentric.
- Apply medium-strength thread locker to spacer-to-hub fasteners if specified.
- Torque in a star pattern with a calibrated wrench (typical: 110 Nm M12, 140 Nm M14; follow your spec).
- Confirm hub-centric seating of the wheel on the spacer lip.
- Check thread engagement: at least the stud’s diameter in threads.
Post-install checklist:
- Re-torque after 50-100 km, then at regular service intervals.
- Listen and feel: any new vibration, ticking, or shimmy means stop and inspect.
- After hard driving or off-road, inspect for fretting, shiny arcs, or black dust around nuts.
Troubleshooting quick hits:
- Vibration at 90-110 km/h: check hub-centric fit, wheel balance, and runout. If you can feel it in the steering more than the seat, it’s likely front.
- Wheel won’t sit flush: paint or rust on the hub face, or the spacer lip is too tall for your wheel bore. Fix the interference, don’t force it.
- Torque keeps dropping: threads may be dirty or stretched, or the nut seats are mismatched. Replace questionable hardware.
- Clicks on turns: one or more studs may be yielding. Remove, inspect, and replace hardware before it snowballs.
Mini-FAQ
- Are 2 piece wheel spacers safe? Yes, when they’re hub-centric, high quality, torqued right, and inspected-on track or private property. On public roads in Australia, they’re usually not legal without engineering approval.
- Do they kill wheel bearings? Small thickness (10-12 mm) on a healthy car is usually fine. Go thicker, add heavy wheels/tyres, and you increase bearing and ball joint loads. Keep it minimal.
- Will insurance care? If a modification is illegal or undeclared, insurers can deny claims. Call your insurer before you fit them for any road use.
- Slip-on vs bolt-on? Slip-ons need longer studs and are more often lug-centric. Two-piece bolt-ons offer better geometry when hub-centric and are easier to get proper thread engagement.
- Use thread locker? Yes, medium-strength on spacer-to-hub bolts if the kit says so. Wheel nuts usually dry, clean threads only.
- How thick is too thick? Start with the thinnest that clears your issue. Once you’re beyond 15-20 mm per side, think hard about wheels with the right offset instead.
- Do I need an alignment? If you’ve been under the car or notice any pull, yes. At minimum, check toe.
- What standards should I look for? ISO 898-1 for stud class, SAE J2530 for wheel strength, and TÜV certification on the spacer kit.
Legal and local notes for Australia (2025):
- National: VSB 14 (NCOP), Section LS (Wheels and Tyres) states spacers/adapters aren’t permitted unless original equipment or specifically engineered and approved.
- South Australia: In line with the NCOP; expect a defect if found on a road vehicle without approval.
- NSW/VIC/QLD: Similar stance; check current state bulletins (e.g., NSW VSI notices, VicRoads Vehicle Standards Information) for any updates.
- If you seek approval, talk to an accredited vehicle engineer and your insurer before spending money.
Smart alternatives for road cars:
- Choose wheels with a lower positive offset that gives the stance you want within legal track limits.
- Use hub-centric rings to fix vibration if your wheels have larger bores.
- Adjust camber slightly (where legal) to tuck the tyre without widening track with spacers.
If you’re set on spacers for non-road use, buy quality, install like a pro, and treat the setup like a safety-critical system. If you’re building a street car in Australia, solve fitment with wheels and alignment first. That way you get the look, the clearance, and the peace of mind-without the defect slip.