Installation Planner
Enter your details to see the estimated effort.
Difficulty
Risk Level
Verdict
🧰 Required Tool Checklist
- Safety First: Jack stands are mandatory (never just jack).
- The Clamps: Coil spring compressors (don't skip!)
- The Lube: Penetrating oil for seized nuts.
- The Fit: Torque wrench for final specs.
⚠️ Post-Install Warning
Wheel Alignment is Mandatory. Changing ride height alters camber and toe settings. Driving without an alignment will eat your tires and hurt handling.
If you've been eyeing that set of lowering springs are aftermarket coil springs designed to drop a vehicle's ride height compared to the factory specification sitting in your garage, you're probably wondering if you have the skills to put them on yourself. The short answer is yes, it's doable, but it isn't exactly "bolt-on" easy like adding floor mats. For most standard vehicles, swapping these springs ranks somewhere between changing brake pads and rebuilding a transmission on the difficulty scale. It requires specific tools, some muscle, and a clear head for safety.
Before we get into the nitty-gritty, let's be clear about what we are talking about. Stock suspension systemthe collection of components including springs, shocks, and linkages that connect the chassis to the wheels works fine for commuting, but it doesn't give that sleek stance or improved handling cornering. Installing performance springs changes that geometry. In my years wrenching on cars in Adelaide, I've seen guys tackle this successfully with just a weekend of work, while others spent three days swearing at rusted bolts because they picked a rainy Tuesday to start.
The Difficulty Depends on Your Vehicle
Not all cars treat you equally. If you own a simple economy sedan from the last decade, you are in luck. These often have straightforward strut assemblies where you can unbolt the top mount and the whole assembly drops out. It's messy, but mechanical logic holds up well. On the flip side, modern luxury brands often hide mounting points behind plastic covers or require computer recalibration after the swap. You might find yourself fighting with electronic suspension sensors rather than just lifting weights.
SUVs add another layer of trouble. Because the rear end often takes more punishment hauling heavy loads, the spring seats can be seized from years of salt and road grime. An older ute with a leaf spring setup is even trickier; you need jack stands under the axle and careful handling to avoid warping the steel. Always check forums specific to your model before buying those springs. What was easy on a Civic might be a nightmare on a BMW E90.
Essential Tools You Actually Need
Here is the reality check: you cannot do this job with just a socket set. Most people underestimate the torque required to remove stock suspension hardware. If you don't have the right gear, you could strip a bolt or worse, hurt your back. Below is a quick checklist of what belongs in your tool bag before you start.
| Tool Name | Why You Need It |
|---|---|
| Spring Compressor | Critical for safety to compress the old spring so you can unbolt the nut. |
| Torque Wrench | Necessary to tighten new bolts to manufacturer specifications to prevent failure. |
| Jack and Jack Stands | For supporting the chassis safely while working underneath. |
| Penetrating Oil | Helps loosen rusted nuts on struts and suspension arms over time. |
| Bungee Cords | Helpful for retracting the caliper piston during reassembly or holding parts aside. |
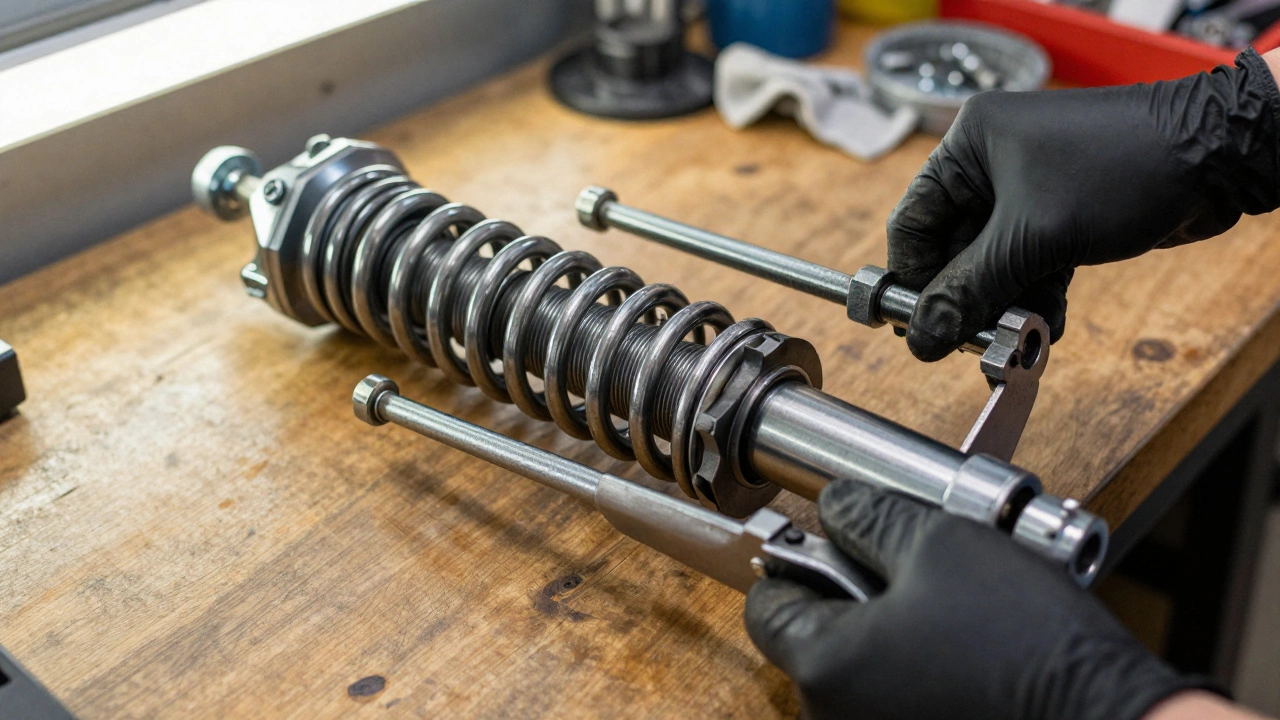
Notice the spring compressorCoil Spring Compressor is on that list. This tool clamps around the spring and tightens it down before you remove the retaining nut. Skipping this step is dangerous. A loaded compression spring stores massive energy, and if that nut spins loose while the tension is held, the tools can fly off like projectiles. Never attempt to uncoil a strut without proper equipment.
The General Process Explained
While every car varies, the core workflow remains fairly consistent across the board. First, you raise the car on jack stands and remove the wheels. This gives you access to the wheel arches and the hub assembly. Next comes the separation of the strut from the suspension arm. You usually need to support the control arm with a separate stand so it doesn't swing loose when you cut the ball joint bolts.
Once the entire strut assembly is free, you take it to a bench. This is where the physical work happens. You attach the spring compressors evenly to opposite sides of the spring windings. Slowly crimp them until there is tension removed from the top nut. Unbolt the nut, discard the old hardware (don't reuse old nuts!), and replace the spring. Many kits come with longer strut mounts or different perch types depending on whether you kept your stock shocks or upgraded them.
Reassembly is the reverse, but pay attention to how the spring sits. If the coils aren't seated properly, the car will rattle or handle unevenly. Tightening everything down should wait until the car is lowered back to the ground so the weight of the chassis settles the suspension bushings into their natural position.
Alignment Is Not Optional
This is the step most DIYers skip to save money, which is a mistake. When you drop the ride height using aftermarket suspension componentsparts modified to improve vehicle performance or aesthetics beyond factory settings, you change the angle at which your tires hit the road. This alters your camber, caster, and toe settings. If you drive away without an alignment, you will likely eat through your front tires within a few thousand miles. Plus, the steering wheel won't center correctly, making driving feel weird.
In Australia, many shops charge extra if you haven't done the lift beforehand, but it's worth spending the $100-$150 to get the geometry sorted properly. It saves you replacing tires later and ensures the braking stability isn't compromised by uneven tire wear.

Risks and Compatibility Issues
Just because a box says "Universal Fitment" doesn't mean it works. Some cheap sets shorten the travel distance too much, causing the bottom-out bump stop to engage over potholes. This feels terrible and damages the chassis. Conversely, if the springs are stiffer than intended, you might lose traction on wet tarmac. Also, check if your shocks are worn out. Mixing fresh, stiff springs with old, leaky shocks creates an unstable mix where the damping oil can't control the new spring energy efficiently.
You also risk voiding warranties. If your car is still covered by a factory warranty, modifying the suspension can invalidate claims related to handling or chassis damage. Insurance providers might also balk if they find non-standard parts involved in a claim. Keep receipts and records of what you buy, and ensure the brand meets industry standards for safety.
Time Estimate and Cost
How long does this actually take? If you are experienced and the bolts aren't rusted, expect about four to six hours for a two-wheel swap on a sedan. That includes removing wheels, breaking seized bolts, swapping the units, and reinstalling. For a first-timer, plan for a full Saturday day. Don't rush. Rushing leads to dropped bolts and stripped threads. As for cost, DIY is cheaper, saving you roughly $200-$400 on labor compared to a shop quote, but factor in the potential cost of alignment and new bushings.
Sometimes, calling a pro is smarter. If you live in an area with strict inspections or high traffic density where parking is a nightmare, hiring someone frees you up and ensures no mistakes are made with safety-critical fasteners. There is no shame in paying for peace of mind.
Can I install lowering springs without new shocks?
Yes, you can install them on stock shocks, but it reduces the lifespan of both. Newer, stiffer springs will compress stock shocks faster, leading to reduced comfort and potential bottoming out. Upgrading to matching coilovers is recommended for longevity.
Do I need an alignment after installing lowering springs?
Absolutely. Changing ride height affects wheel angles significantly. Driving without alignment causes rapid tire wear and poor handling. Get a professional alignment immediately after installation.
Is it safe to sleep in the car with lowered springs?
It depends on how low you go. Extreme dropping can scrape curbs, risking damage to the subframe or oil pan. Moderate lowering (1-2 inches) generally maintains clearance for typical driving scenarios.
What if the spring seat doesn't line up?
If the perches don't match, do not force them. Using adapters or shims may be necessary. Incorrect seating can cause vibration and safety hazards. Consult a specialist if the parts seem incompatible.
Will lowering springs affect my car insurance?
In many regions, cosmetic modifications need to be declared to insurance companies. Failure to declare upgrades could lead to rejected claims. Check your policy terms before completing the installation.