Carbon Fiber Spoiler Repair Decision Tool
Damage Severity:
Repair Viability:
Recommended Steps:
That sharp crack on your carbon fiber spoiler is more than just a cosmetic flaw. It’s a structural warning. Whether it happened from hitting a garage door, a rock on the highway, or improper installation stress, you’re probably wondering if you can save that expensive piece of aero equipment. The short answer is yes, but only if you handle it correctly. Unlike metal bumpers that can be hammered back into shape, carbon fiber reinforced polymer (CFRP) relies on the integrity of its woven strands and resin matrix. Once those strands break, they don’t magically heal themselves.
Ignoring a damaged spoiler can lead to catastrophic failure at high speeds. A compromised aerodynamic component can flutter, vibrate, or even detach entirely, posing a serious safety risk to you and other drivers. Before you toss it in the trash or buy a replacement, let’s look at how to assess the damage, what tools you need, and whether a DIY fix is actually safe for your specific situation.
Assessing the Damage: Can It Actually Be Fixed?
Not every crack is created equal. In the world of composite materials, damage falls into three main categories: surface abrasion, structural cracking, and delamination. Your repair strategy depends entirely on which one you’re dealing with.
- Surface Abrasion: This looks like a scratch or a dull spot where the clear coat has worn off. The underlying weave is intact. This is purely cosmetic and easy to fix with polishing compounds or a new layer of clear coat.
- Structural Cracking: You see a visible line running through the material. If you run your fingernail across it and it catches, the fibers are broken. This affects strength and requires resin infusion or patching.
- Delamination: The layers of the carbon fiber are separating. You might hear a hollow sound when you tap it, or see a bubble forming under the surface. This is the most dangerous type of damage because the internal structure is failing.
If the damage is small-less than two inches-and doesn’t affect the mounting points or the leading edge, a repair is usually viable. However, if the core structure is crushed or the mounting tabs are snapped off, professional intervention is mandatory. Attempting to glue a broken mount back together is a recipe for disaster on the highway.
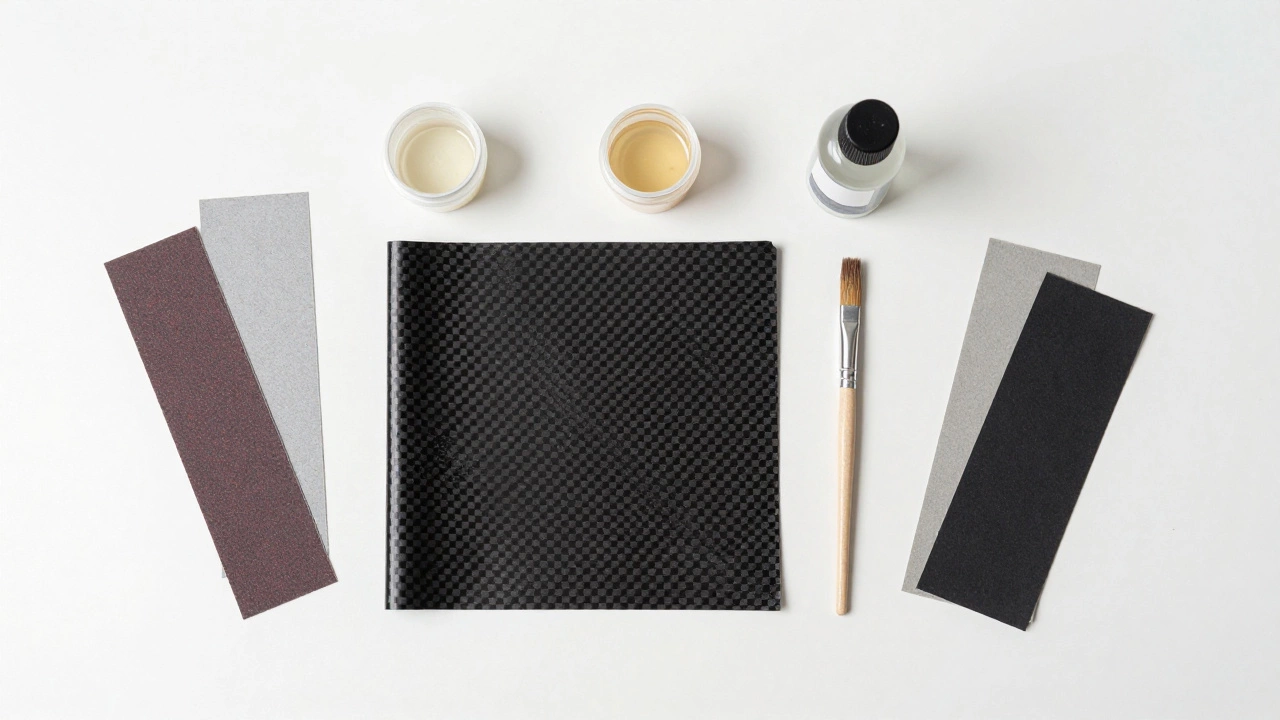
Gathering the Right Tools and Materials
You can’t fix carbon fiber with standard household glue or superglue. These adhesives are too brittle and cannot withstand the vibrations and thermal expansion of a car driving on the road. You need materials designed specifically for composite bonding.
| Material | Purpose | Why It Matters |
|---|---|---|
| Epoxy Resin | Bonds fibers and fills cracks | Must be flexible yet strong; standard glue cracks under vibration. |
| Carbon Fiber Cloth | Reinforces the patch | Provides tensile strength; plain fiberglass won't match the stiffness. |
| Acetone | Cleans the surface | Removes oils and contaminants so the epoxy bonds chemically. |
| Sandpaper (80-400 grit) | Preps and finishes | Roughens the surface for adhesion and smooths the final repair. |
| Clear Coat Spray | Protects and restores shine | UV protection prevents the resin from yellowing over time. |
Invest in a high-quality marine-grade or aerospace-grade epoxy. Brands like West System or TotalBoat offer resins that cure hard and resist moisture. Using cheap hardware store epoxy will result in a repair that fails within months due to heat cycles from the sun and engine bay radiation.
Step-by-Step Repair Process for Minor Cracks
If you’ve determined the damage is superficial or a minor crack, here is how you execute a proper repair. Work in a clean, dust-free environment. Dust particles trapped in the epoxy will create weak spots.
- Clean the Area: Wash the spoiler with soap and water, then wipe it down thoroughly with acetone. Wait for it to dry completely. Any oil residue will prevent the bond.
- Sand the Surface: Use 80-grit sandpaper to roughen the area around the crack. Extend this sanded area by about an inch beyond the visible damage. This gives the new resin something to grip onto.
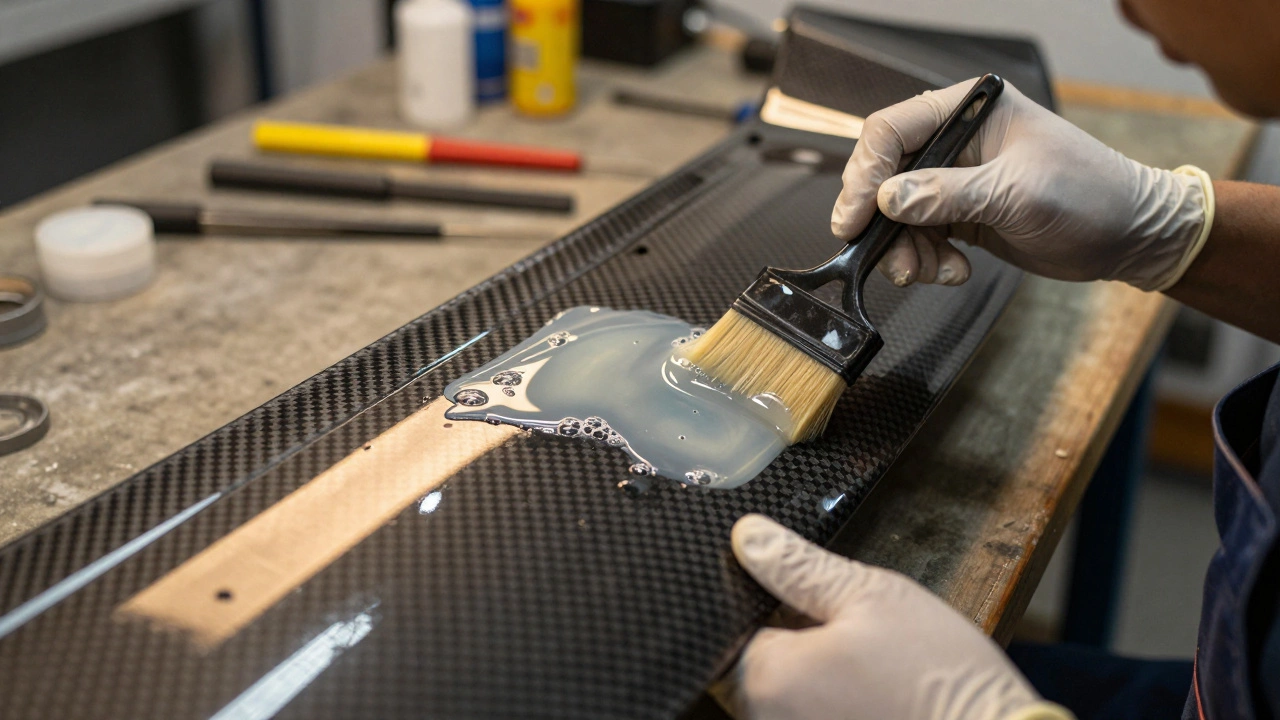
- Mix the Epoxy: Follow the manufacturer’s instructions precisely. Mix only as much as you can use within the working time (usually 15-30 minutes). Uneven mixing leads to soft spots.
- Apply the First Layer: Brush a thin layer of epoxy into the crack. Ensure it penetrates deep into the fissure. You can use a toothpick to work it in.
- Add Reinforcement: Cut a piece of carbon fiber cloth slightly larger than the sanded area. Press it into the wet epoxy. Smooth out any bubbles with a brush or roller. This layer acts as the new skeleton for the repair.
- Build Up Layers: Apply additional layers of epoxy and cloth if the crack is deep. Each subsequent layer should overlap the previous one by half an inch to distribute stress.
- Cure Completely: Let it sit undisturbed for at least 24 hours. Do not rush this step. Full strength takes up to 72 hours to develop.
- Sand and Finish: Once cured, sand the repair flush with the surrounding surface using progressively finer grits (up to 400). Finally, apply a matching clear coat to blend the repair with the rest of the spoiler.
When DIY Isn’t Enough: Structural Failures
Some damages require more than just a patch job. If your spoiler has suffered delamination or a major impact that crushed the foam core inside, a simple surface repair won’t restore its strength. In these cases, you need to access the interior of the part.
This involves carefully cutting away the damaged section, removing the old foam or honeycomb core, and replacing it with new structural material. Then, you must lay up new carbon fiber layers on both the inside and outside to re-integrate the panel. This process requires vacuum bagging equipment to ensure there are no air pockets and that the fibers are compressed tightly. Without proper compression, the repair will be weak and likely to fail again.
If you don’t have access to a vacuum pump and bagging film, take the spoiler to a professional composite repair shop. They have the tools to ensure the repair meets factory specifications. Trying to replicate this process at home often results in a heavy, uneven, and unsafe repair.
Preventing Future Damage
Once your spoiler is repaired, protecting it is crucial. Carbon fiber is strong but brittle compared to plastic. It doesn’t bend; it breaks. Here are some practical tips to keep your spoiler intact:
- Use Proper Adhesives: When installing or reinstalling the spoiler, use 3M VHB tape or high-strength automotive epoxy. Mechanical bolts are best if drilled correctly, but ensure the holes are sealed to prevent water ingress.
- Avoid High Pressure Washing: Don’t point a pressure washer directly at the edges of the spoiler. The force can lift the edges and cause delamination over time.
- Check for Vibrations: If you notice buzzing or fluttering while driving, stop immediately. This indicates a loose mount or structural weakness. Tightening the mounts early can prevent further cracking.
- Regular Waxing: Apply a ceramic coating or wax to protect the clear coat. UV rays degrade the resin binding the fibers, making them more susceptible to chipping.
Cost vs. Replacement: Is It Worth It?
A genuine OEM carbon fiber spoiler can cost anywhere from $500 to over $2,000 depending on the car model. A DIY repair kit typically costs between $50 and $150. Professional repairs can range from $200 to $600. If the aesthetic value of the original part is high, or if it’s a rare aftermarket piece, repairing is almost always cheaper and better for preserving the vehicle's authenticity.
However, if the spoiler is mass-produced and widely available for a low price, buying a new one might be more reliable. Consider the labor cost of your own time. If you spend ten hours perfecting a repair that still looks slightly different, was it worth it? For most enthusiasts, the satisfaction of restoring their own part outweighs the convenience of a replacement.
Can I use superglue to fix a carbon fiber spoiler?
No, you should never use superglue (cyanoacrylate) for structural repairs on carbon fiber. Superglue is extremely brittle and lacks the flexibility to handle the vibrations and temperature changes experienced by a car part. It will likely crack and fail quickly. Always use a two-part epoxy resin designed for composites.
How long does a carbon fiber repair last?
If done correctly with high-quality epoxy and proper surface preparation, a carbon fiber repair can last indefinitely. The bond is often stronger than the original material in the immediate area. However, if the repair is poorly executed or uses low-grade materials, it may fail within a year due to UV exposure and vibration.
Is it safe to drive with a cracked spoiler?
It depends on the severity of the crack. Small surface cracks are generally safe for short distances, but structural cracks pose a significant risk. At high speeds, aerodynamic forces can worsen the crack, potentially causing the spoiler to detach. If you hear flapping noises or see movement, do not drive until it is repaired or removed.
Can I paint over a carbon fiber repair?
Yes, but you must use the right products. Standard automotive paint may not adhere well to epoxy. It is best to use a clear coat designed for carbon fiber or composite repairs. This ensures the finish matches the gloss level of the original spoiler and provides UV protection to prevent yellowing.
What is the difference between dry and wet carbon fiber repair?
Most consumer spoilers are "wet" carbon fiber, meaning the resin is mixed and applied by hand during manufacturing. Dry carbon fiber involves pre-impregnated fibers cured under heat and pressure. For repairs, you will almost always use wet layup techniques with epoxy resin. You cannot easily replicate dry carbon processes at home without industrial autoclaves.