10W Laser: What It Is and How to Use It
If you’ve ever watched a video of a laser cutting wood or engraving a metal badge, you know the result can look amazing. A 10W laser is a small but powerful tool that fits on a workbench and can cut thin materials or add detailed marks. It’s not a big industrial machine, but for a hobbyist it does the job fast and clean.
Most 10W lasers use a diode or fiber source that produces a focused beam of light. The beam is thin, so it can melt or vaporize material in a narrow line. That means you can cut paper, cardboard, acrylic up to a few millimetres thick, and you can engrave leather, wood, or even some plastics. The key is to match the material, speed, and power settings.
Choosing the Right 10W Laser for Your Projects
First, decide what you’ll work on most. If you plan to cut acrylic sheets for signs, look for a laser that has a good cooling system and a stable focus lens. If engraving is your main goal, a diode laser with a fine spot size will give clearer lines.
Second, check the software. Some lasers come with simple desktop apps that let you upload a picture and adjust power, speed, and passes. Others need a more advanced program. Pick one that feels easy to learn – you don’t need a PhD to start.
Third, think about the work area. A 10W laser produces a small amount of smoke, especially when cutting plastics. Having a small extractor fan or working in a ventilated garage keeps the air fresh and protects the optics.
Lastly, compare price and warranty. You’ll find kits ranging from £100 to £400. The higher‑end models often include a metal body, better cooling, and a longer warranty, which can save you money if the laser runs a lot.
Safety Tips and Best Practices
Even though a 10W laser is low power, it can still burn skin or damage eyes. Always wear safety glasses that match the laser’s wavelength – most kits will tell you which shade to use.
Never leave the laser running unattended. A small fire can start if the beam hits something flammable for too long. Keep a fire extinguisher nearby, just in case.
Use the right settings for each material. Start with low power and a slower speed, then do a test cut on a scrap piece. If the cut is too shallow, increase power a bit. If the material melts too much, slow the speed or lower power.Keep the lens and mirrors clean. A dusty lens reduces beam quality and can overheat the laser. Wipe it gently with a lint‑free cloth and a dab of lens cleaner.
Finally, organize your workspace. Have a dedicated spot for the laser, a place to store materials, and a clean surface for finished parts. A tidy bench makes it easier to spot problems early.
With the right 10W laser and a bit of practice, you can cut custom keychains, engrave personalized gifts, or prototype small parts for a project. The learning curve is short – just start with simple cuts, follow the safety steps, and you’ll see results fast. Happy cutting!
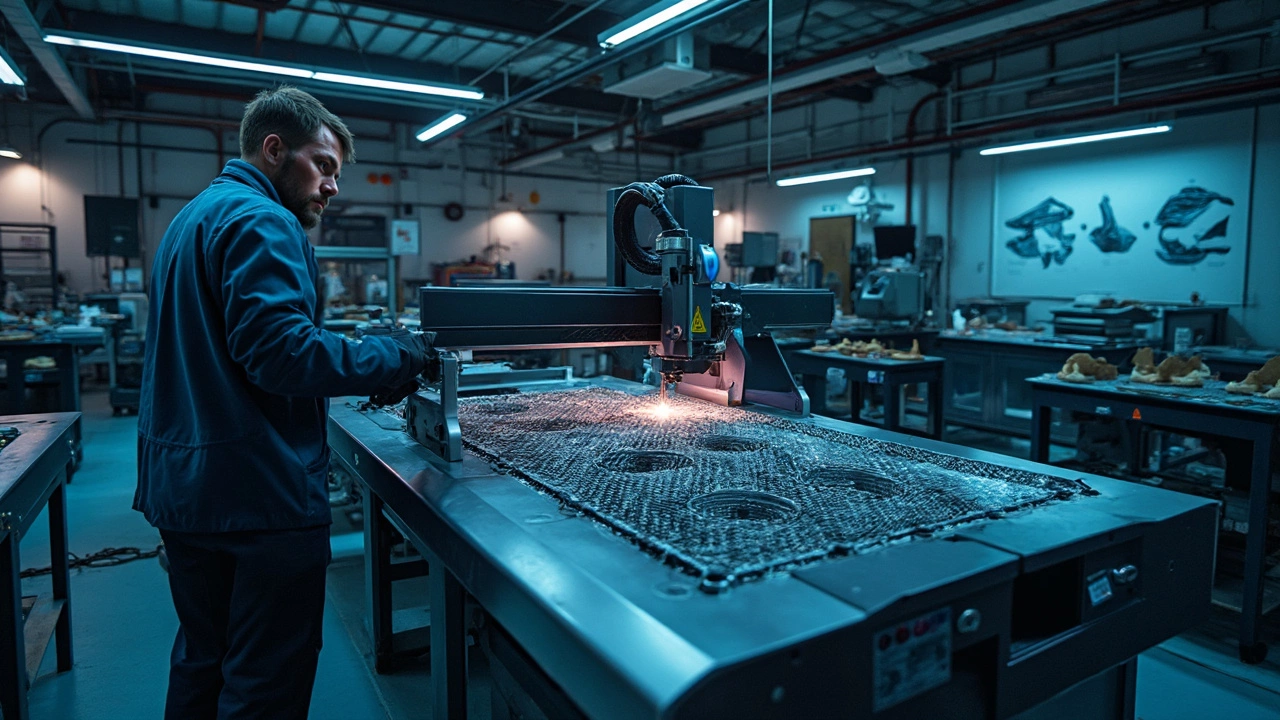
Can a 10W Laser Cut Carbon Fiber? Unpacking the Myths
Wondering if a 10W laser can tackle carbon fiber? It's not as simple as it sounds. The power and precision of the laser, along with the properties of carbon fiber, play critical roles. Whether you're in the spoiler-making business or just curious about laser cutting's capabilities, you'll want to know the ins and outs of how these elements interact. Get the lowdown on what's feasible and what's not.