What is the best thing to clean car interior with? The ultimate guide for 2026
Ever walked into your car and smelled that distinct mix of old coffee, stale air conditioning, and whatever mystery substance spilled three years ago? We’ve all been there. You look at the dashboard, the seats, and the floor mats, and you realize it’s not just dirty—it’s neglected. But here is the hard truth: grabbing a random bottle of multi-surface cleaner from your kitchen cupboard is the fastest way to ruin your car’s interior. That harsh chemical might strip the protective coating off your dashboard, leaving it cracked and faded under the Australian sun.
So, what is actually the best thing to clean car interior with? It isn’t one single magic spray. It is a specific toolkit tailored to the materials in your vehicle. Your leather seats need hydration, your plastics need protection, and your fabrics need agitation. Getting this right keeps your car looking new and protects its resale value. Let’s break down exactly what you need for every surface.
The Foundation: Mechanical Removal Before Chemicals
Before you buy any fancy spray, you need to understand that 80% of cleaning is mechanical. If you spray cleaner onto a dusty dashboard, you are just making mud. This mud then dries into a sticky film that attracts even more dust later. The first step in any professional detail is removing loose debris.
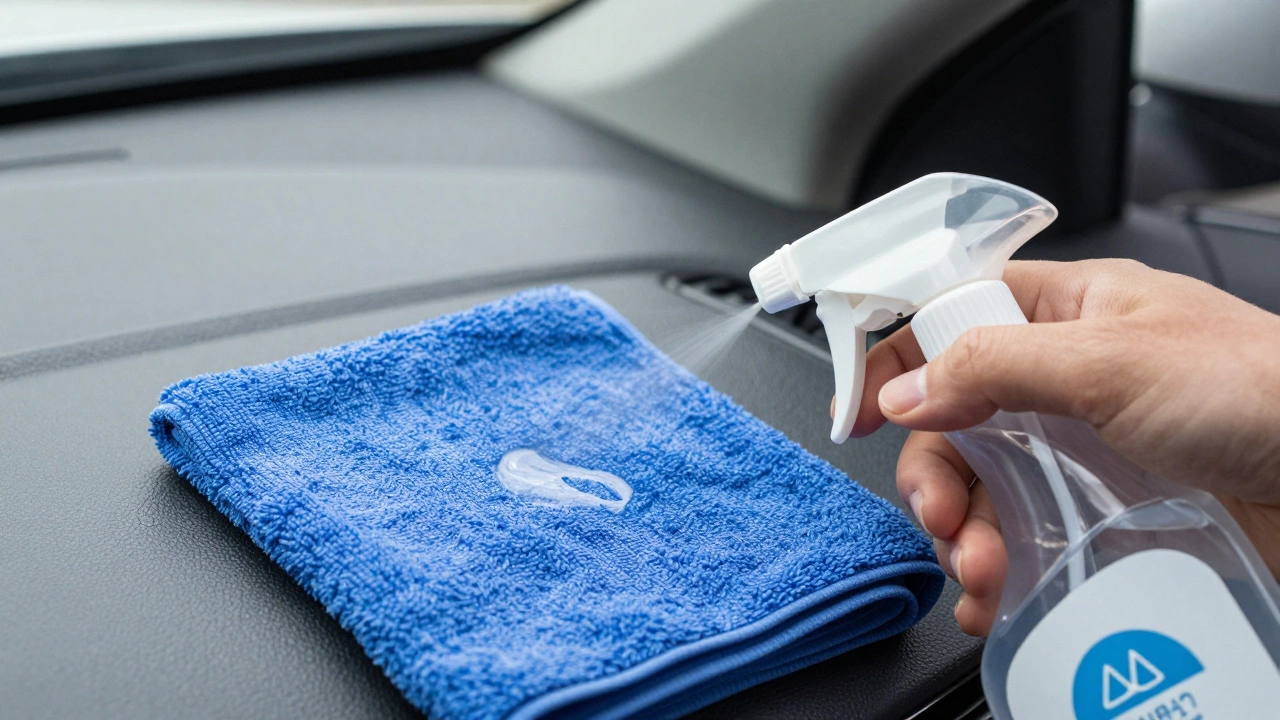
Microfiber Towels are the essential tool for safe, scratch-free wiping and drying. Unlike cotton rags or paper towels, which can leave lint or cause micro-scratches on sensitive surfaces, high-quality microfiber uses split fibers to trap dirt deep within the weave. For a proper clean, you should have at least three types: plush towels for delicate dashboards, waffle-weave towels for drying wet surfaces, and standard weaves for general wiping.
Start by vacuuming everything. Use the brush attachment to agitate the carpet fibers so the dirt lifts up. Don't forget the gaps between the seats and the center console—those are black holes for crumbs and coins. Once the loose dirt is gone, wipe down all hard surfaces with a dry microfiber towel to remove the layer of dust. Only now are you ready to apply liquids.
Hard Surfaces: Dashboards, Consoles, and Door Panels
Your dashboard and door panels are usually made of vinyl, PVC, or soft-touch plastic. These materials degrade when exposed to UV rays and heat. In Adelaide, where the summer sun can bake the interior to over 50°C, this degradation happens fast. You need a product that cleans without stripping the factory UV protectant.
Avoid silicone-based dressings if you want a natural look. Silicone gives a greasy, reflective shine that looks cheap and attracts dust like a magnet. Instead, use an AP (Alkyl Polyglucoside) based interior cleaner. These are gentle surfactants derived from plants. They lift grime effectively but rinse away cleanly, leaving no oily residue.
- AP Interior Cleaner: Spray it onto a microfiber towel, not directly onto the dashboard. Wipe the surface in circular motions. This prevents overspray from hitting your windows or air vents.
- UV Protectant: After cleaning, apply a water-based UV protectant. This restores the matte finish and adds a barrier against cracking. Look for products containing benzotriazole, a common UV absorber used in automotive coatings.
- Air Vents: Use a soft-bristled brush (like a makeup brush or a dedicated vent brush) to sweep dust out of the slats. Follow up with a slightly damp microfiber cloth wrapped around a flat tool to wipe each slat individually.
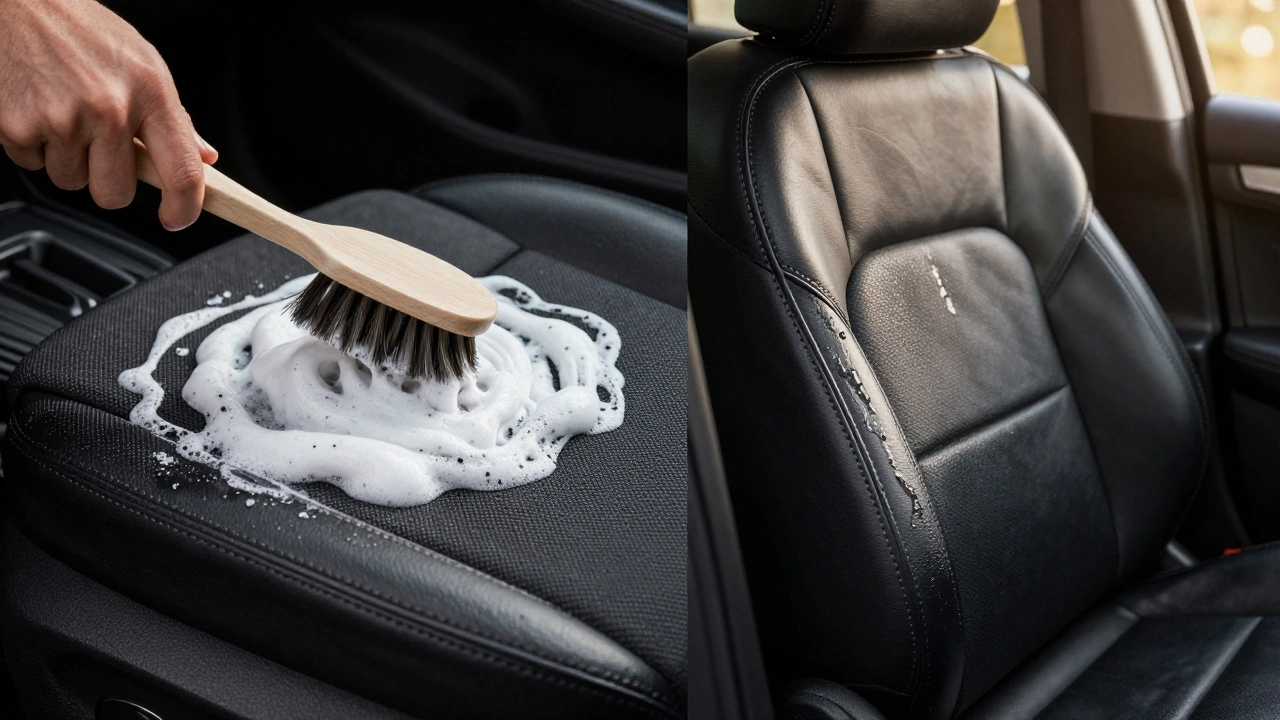
Leather Seats: Hydration Over Cleaning
If your car has real leather, treat it like your skin. Leather is porous; it breathes. When you sit in it, sweat and oils transfer into the pores. Over time, this causes the leather to dry out, stiffen, and eventually crack. Standard cleaners often contain alcohol or strong solvents that accelerate this drying process.
The best approach for leather is a two-step system: Cleanse and Condition.
- Cleanse: Use a pH-balanced leather cleaner. A pH of 7 is neutral and safe for most leathers. Apply it with a horsehair brush or a soft microfiber mitt. Agitate gently to lift the embedded grime from the grain. Wipe away the residue with a clean, damp towel.
- Condition: This is the critical step. Apply a leather conditioner containing lanolin or beeswax. These ingredients replenish the natural oils lost during cleaning. Massage it into the leather and let it absorb for 10-15 minutes before buffing off any excess. Do this every 3-6 months, depending on how much you drive.
Warning: Never use household furniture polish on car leather. It often contains silicones and waxes that clog the leather's pores, preventing it from breathing and leading to premature rot.
Fabric Seats and Carpets: The Power of Extraction
Fabric interiors are tough, but they are also sponges for stains and odors. Spraying cleaner on fabric seats rarely works because the liquid sits on top or pushes the stain deeper into the padding. To truly clean fabric, you need extraction.
If you have access to a wet/dry vacuum with an upholstery attachment, you’re in luck. If not, rent a portable extractor. Here is the workflow:
- Pre-treatment: Identify stains. For organic stains (coffee, food), use an enzymatic cleaner. Enzymes break down the protein structure of the stain. For ink or grease, use a specialized degreaser.
- Agitation: Scrub the area with a stiff nylon brush. This loosens the dirt from the fiber matrix.
- Extraction: Spray your upholstery shampoo (a low-foaming formula designed for extractors) and immediately suck it back up along with the dissolved dirt. Repeat until the water coming out is clear.
For those who don’t want to rent equipment, a dry foam cleaner is a viable alternative. You whip up a thick foam, apply it to the fabric, scrub, and then vacuum up the dried foam particles. It’s less effective than water extraction but far safer for DIYers worried about mold growth from over-wetting.
Glass and Mirrors: Streak-Free Clarity
Interior glass gets foggy from breath, humidity, and the off-gassing of dashboard plastics. Ammonia-based window cleaners are a big no-no inside your car. Ammonia can etch tinted windows and damage the anti-glare coating on rearview mirrors.
Use a dedicated automotive glass cleaner or simply a 50/50 mix of distilled water and white vinegar. Vinegar cuts through the oily film without leaving streaks. Apply it to a microfiber towel and wipe in an S-pattern. Finish with a dry, clean microfiber towel to buff away any remaining moisture. For side mirrors, pay attention to the edges where dirt accumulates.
Comparison of Top Cleaning Agents
| Surface Type | Best Cleaner Type | Key Ingredient | Avoid |
|---|---|---|---|
| Dash & Plastics | AP Interior Cleaner | Alkyl Polyglucoside | Silicone sprays, bleach |
| Real Leather | pH-Balanced Leather Soap | Mild Surfactants | Alcohol, saddle soap |
| Fabric/Carpets | Upholstery Shampoo | Low-Foam Detergents | Household carpet powder |
| Glass | Ammonia-Free Glass Cleaner | Vinegar or Isopropyl Alcohol | Windex (standard) |
| Rubber Mats | Degreaser | Citrus Solvents | Oil-based conditioners |
Natural Alternatives: DIY Solutions
You don’t always need to buy branded products. Simple household items can work wonders if used correctly. However, caution is key. Always test any DIY solution on a hidden spot first.
Vinegar and Water: As mentioned, this is great for glass and hard plastics. It disinfects and removes grime. Mix equal parts white vinegar and distilled water in a spray bottle.
Baking Soda: This is the king of odor removal. Sprinkle baking soda on your carpets and fabric seats, let it sit for an hour, and then vacuum it up. It absorbs moisture and neutralizes acidic odors like pet smells or spoiled food.
Isopropyl Alcohol: Diluted to 10%, this is excellent for removing gum, sticker residue, or ink spots from hard plastics. Use sparingly and wipe immediately with a damp cloth, as higher concentrations can dry out plastics.
Common Mistakes to Avoid
Even with the right products, technique matters. Here are the most common errors people make:
- Over-wetting electronics: Never spray directly onto buttons, screens, or air vents. Liquid can seep into the circuitry and cause short circuits. Always spray the towel, then wipe the surface.
- Using too much product: A little goes a long way. Excess cleaner leaves a residue that turns yellow over time, especially on light-colored dashboards.
- Ignoring the steering wheel: This is the most touched surface in your car. It’s covered in bacteria, oil, and sweat. Clean it with a mild antibacterial soap and water, then condition if it’s leather.
- Direct Sunlight Cleaning: Never clean your car interior in direct sunlight. The heat causes cleaners to evaporate too quickly, leaving streaks and water spots. Park in the shade or clean at night.
Maintaining the Clean
Cleaning is not a one-time event; it’s a habit. To keep your interior fresh between deep cleans:
- Keep a small trash bin in the trunk to prevent food wrappers from accumulating.
- Use seat covers if you have pets or young children.
- Run the AC on fresh air mode occasionally to flush out ducts.
- Wipe down spills immediately. Coffee and juice become permanent stains if left to set.
By respecting the materials in your car and using the right tools, you’ll maintain an interior that feels premium and lasts for years. It’s not about buying the most expensive kit; it’s about understanding what each surface needs.
Can I use Windex to clean my car interior?
Standard Windex contains ammonia, which can damage tinted windows and anti-glare mirror coatings. It can also dry out leather and plastic surfaces. Use an ammonia-free automotive glass cleaner instead.
How often should I condition my leather seats?
In hot climates like Australia, condition your leather every 3 months. In cooler climates, every 6 months is sufficient. Over-conditioning can lead to a slippery surface, so only apply as much as the leather absorbs.
What is the best way to remove stains from fabric seats?
Blot the stain immediately with a clean cloth. Then, use an enzymatic cleaner for organic stains or a degreaser for oil-based stains. Agitate with a brush and extract with a wet vac or dry foam cleaner.
Is dish soap safe for cleaning car interiors?
Dish soap is too harsh for regular use on dashboards and leather as it strips natural oils. It can be used diluted for heavy grease on rubber mats, but avoid it on sensitive surfaces.
How do I get rid of bad smells in my car?
First, find the source. Check under seats for spills. Clean the cabin air filter. Use baking soda on carpets to absorb odors. For persistent smells, consider an ozone treatment or steam cleaning the upholstery.
Ever walked into your car and smelled that distinct mix of old coffee, stale air conditioning, and whatever mystery substance spilled three years ago? We’ve all been there. You look at the dashboard, the seats, and the floor mats, and you realize it’s not just dirty-it’s neglected. But here is the hard truth: grabbing a random bottle of multi-surface cleaner from your kitchen cupboard is the fastest way to ruin your car’s interior. That harsh chemical might strip the protective coating off your dashboard, leaving it cracked and faded under the Australian sun.
So, what is actually the best thing to clean car interior with? It isn’t one single magic spray. It is a specific toolkit tailored to the materials in your vehicle. Your leather seats need hydration, your plastics need protection, and your fabrics need agitation. Getting this right keeps your car looking new and protects its resale value. Let’s break down exactly what you need for every surface.
The Foundation: Mechanical Removal Before Chemicals
Before you buy any fancy spray, you need to understand that 80% of cleaning is mechanical. If you spray cleaner onto a dusty dashboard, you are just making mud. This mud then dries into a sticky film that attracts even more dust later. The first step in any professional detail is removing loose debris.
Start by vacuuming everything. Use the brush attachment to agitate the carpet fibers so the dirt lifts up. Don't forget the gaps between the seats and the center console-those are black holes for crumbs and coins. Once the loose dirt is gone, wipe down all hard surfaces with a dry microfiber towel to remove the layer of dust. Only now are you ready to apply liquids.
Hard Surfaces: Dashboards, Consoles, and Door Panels
Your dashboard and door panels are usually made of vinyl, PVC, or soft-touch plastic. These materials degrade when exposed to UV rays and heat. In Adelaide, where the summer sun can bake the interior to over 50°C, this degradation happens fast. You need a product that cleans without stripping the factory UV protectant.
Avoid silicone-based dressings if you want a natural look. Silicone gives a greasy, reflective shine that looks cheap and attracts dust like a magnet. Instead, use an AP (Alkyl Polyglucoside) based interior cleaner. These are gentle surfactants derived from plants. They lift grime effectively but rinse away cleanly, leaving no oily residue.
- AP Interior Cleaner: Spray it onto a microfiber towel, not directly onto the dashboard. Wipe the surface in circular motions. This prevents overspray from hitting your windows or air vents.
- UV Protectant: After cleaning, apply a water-based UV protectant. This restores the matte finish and adds a barrier against cracking. Look for products containing benzotriazole, a common UV absorber used in automotive coatings.
- Air Vents: Use a soft-bristled brush (like a makeup brush or a dedicated vent brush) to sweep dust out of the slats. Follow up with a slightly damp microfiber cloth wrapped around a flat tool to wipe each slat individually.
Leather Seats: Hydration Over Cleaning
If your car has real leather, treat it like your skin. Leather is porous; it breathes. When you sit in it, sweat and oils transfer into the pores. Over time, this causes the leather to dry out, stiffen, and eventually crack. Standard cleaners often contain alcohol or strong solvents that accelerate this drying process.
The best approach for leather is a two-step system: Cleanse and Condition.
- Cleanse: Use a pH-balanced leather cleaner. A pH of 7 is neutral and safe for most leathers. Apply it with a horsehair brush or a soft microfiber mitt. Agitate gently to lift the embedded grime from the grain. Wipe away the residue with a clean, damp towel.
- Condition: This is the critical step. Apply a leather conditioner containing lanolin or beeswax. These ingredients replenish the natural oils lost during cleaning. Massage it into the leather and let it absorb for 10-15 minutes before buffing off any excess. Do this every 3-6 months, depending on how much you drive.
Warning: Never use household furniture polish on car leather. It often contains silicones and waxes that clog the leather's pores, preventing it from breathing and leading to premature rot.
Fabric Seats and Carpets: The Power of Extraction
Fabric interiors are tough, but they are also sponges for stains and odors. Spraying cleaner on fabric seats rarely works because the liquid sits on top or pushes the stain deeper into the padding. To truly clean fabric, you need extraction.
If you have access to a wet/dry vacuum with an upholstery attachment, you’re in luck. If not, rent a portable extractor. Here is the workflow:
- Pre-treatment: Identify stains. For organic stains (coffee, food), use an enzymatic cleaner. Enzymes break down the protein structure of the stain. For ink or grease, use a specialized degreaser.
- Agitation: Scrub the area with a stiff nylon brush. This loosens the dirt from the fiber matrix.
- Extraction: Spray your upholstery shampoo (a low-foaming formula designed for extractors) and immediately suck it back up along with the dissolved dirt. Repeat until the water coming out is clear.
For those who don’t want to rent equipment, a dry foam cleaner is a viable alternative. You whip up a thick foam, apply it to the fabric, scrub, and then vacuum up the dried foam particles. It’s less effective than water extraction but far safer for DIYers worried about mold growth from over-wetting.
Glass and Mirrors: Streak-Free Clarity
Interior glass gets foggy from breath, humidity, and the off-gassing of dashboard plastics. Ammonia-based window cleaners are a big no-no inside your car. Ammonia can etch tinted windows and damage the anti-glare coating on rearview mirrors.
Use a dedicated automotive glass cleaner or simply a 50/50 mix of distilled water and white vinegar. Vinegar cuts through the oily film without leaving streaks. Apply it to a microfiber towel and wipe in an S-pattern. Finish with a dry, clean microfiber towel to buff away any remaining moisture. For side mirrors, pay attention to the edges where dirt accumulates.
Comparison of Top Cleaning Agents
| Surface Type | Best Cleaner Type | Key Ingredient | Avoid |
|---|---|---|---|
| Dash & Plastics | AP Interior Cleaner | Alkyl Polyglucoside | Silicone sprays, bleach |
| Real Leather | pH-Balanced Leather Soap | Mild Surfactants | Alcohol, saddle soap |
| Fabric/Carpets | Upholstery Shampoo | Low-Foam Detergents | Household carpet powder |
| Glass | Ammonia-Free Glass Cleaner | Vinegar or Isopropyl Alcohol | Windex (standard) |
| Rubber Mats | Degreaser | Citrus Solvents | Oil-based conditioners |
Natural Alternatives: DIY Solutions
You don’t always need to buy branded products. Simple household items can work wonders if used correctly. However, caution is key. Always test any DIY solution on a hidden spot first.
Vinegar and Water: As mentioned, this is great for glass and hard plastics. It disinfects and removes grime. Mix equal parts white vinegar and distilled water in a spray bottle.
Baking Soda: This is the king of odor removal. Sprinkle baking soda on your carpets and fabric seats, let it sit for an hour, and then vacuum it up. It absorbs moisture and neutralizes acidic odors like pet smells or spoiled food.
Isopropyl Alcohol: Diluted to 10%, this is excellent for removing gum, sticker residue, or ink spots from hard plastics. Use sparingly and wipe immediately with a damp cloth, as higher concentrations can dry out plastics.
Common Mistakes to Avoid
Even with the right products, technique matters. Here are the most common errors people make:
- Over-wetting electronics: Never spray directly onto buttons, screens, or air vents. Liquid can seep into the circuitry and cause short circuits. Always spray the towel, then wipe the surface.
- Using too much product: A little goes a long way. Excess cleaner leaves a residue that turns yellow over time, especially on light-colored dashboards.
- Ignoring the steering wheel: This is the most touched surface in your car. It’s covered in bacteria, oil, and sweat. Clean it with a mild antibacterial soap and water, then condition if it’s leather.
- Direct Sunlight Cleaning: Never clean your car interior in direct sunlight. The heat causes cleaners to evaporate too quickly, leaving streaks and water spots. Park in the shade or clean at night.
Maintaining the Clean
Cleaning is not a one-time event; it’s a habit. To keep your interior fresh between deep cleans:
- Keep a small trash bin in the trunk to prevent food wrappers from accumulating.
- Use seat covers if you have pets or young children.
- Run the AC on fresh air mode occasionally to flush out ducts.
- Wipe down spills immediately. Coffee and juice become permanent stains if left to set.
By respecting the materials in your car and using the right tools, you’ll maintain an interior that feels premium and lasts for years. It’s not about buying the most expensive kit; it’s about understanding what each surface needs.
Can I use Windex to clean my car interior?
Standard Windex contains ammonia, which can damage tinted windows and anti-glare mirror coatings. It can also dry out leather and plastic surfaces. Use an ammonia-free automotive glass cleaner instead.
How often should I condition my leather seats?
In hot climates like Australia, condition your leather every 3 months. In cooler climates, every 6 months is sufficient. Over-conditioning can lead to a slippery surface, so only apply as much as the leather absorbs.
What is the best way to remove stains from fabric seats?
Blot the stain immediately with a clean cloth. Then, use an enzymatic cleaner for organic stains or a degreaser for oil-based stains. Agitate with a brush and extract with a wet vac or dry foam cleaner.
Is dish soap safe for cleaning car interiors?
Dish soap is too harsh for regular use on dashboards and leather as it strips natural oils. It can be used diluted for heavy grease on rubber mats, but avoid it on sensitive surfaces.
How do I get rid of bad smells in my car?
First, find the source. Check under seats for spills. Clean the cabin air filter. Use baking soda on carpets to absorb odors. For persistent smells, consider an ozone treatment or steam cleaning the upholstery.