WD-40 Scratch Repair Calculator
Assess Your Scratch
Enter your scratch details to determine if WD-40 can temporarily mask it.
Ever wondered why you hear people swear by WD-40 as a quick fix for minor car scratches? The truth is, the spray isn’t a magic eraser, but it does something that many DIY‑ers find useful: it reduces friction and temporarily masks the visual impression of a shallow mark. In this guide we’ll break down exactly how the product interacts with paint, when it’s actually effective, and what you should do after the spray to keep your finish looking smooth.
What a car scratch really is
A scratch is essentially a breach in the layered protection that covers a vehicle. Most modern cars have three key layers:
- Base coat - the color pigment.
- Mid‑coat - adds depth and durability.
- Clear coat - a transparent resin that shields the paint from UV, chemicals, and minor abrasions.
When a foreign object (a key, a stone, or a careless door handle) drags across the surface, it can gouge one or more of these layers. The depth of the gouge is measured in microns; a 10‑micron scratch barely reaches the clear coat, while a 100‑micron line might cut into the base coat. The deeper the scratch, the more noticeable it becomes because light reflects differently off the damaged area.
Why WD-40 can make a shallow scratch look less obvious
At its core, WD-40 is an oil‑based lubricant. Its formula contains mineral oil, a light petroleum solvent, and a few additives that prevent rust and displace moisture. When you spray it on a shallow scratch, three things happen:
- Filling the void: The oil seeps into the tiny groove, creating a thin film that reduces the way light bounces off the defect.
- Reducing surface tension: By lowering friction, the spray makes the area feel smoother to the touch, which can lessen the perception of a flaw.
- Temporary masking: The oily sheen slightly changes the color hue, blending the scratch with the surrounding paint.
All of these effects are temporary. The oil will evaporate or wash away within a few days, especially after a wash or a rainstorm. That’s why the spray is useful for “quick‑look” fixes but not a substitute for proper scratch repair.
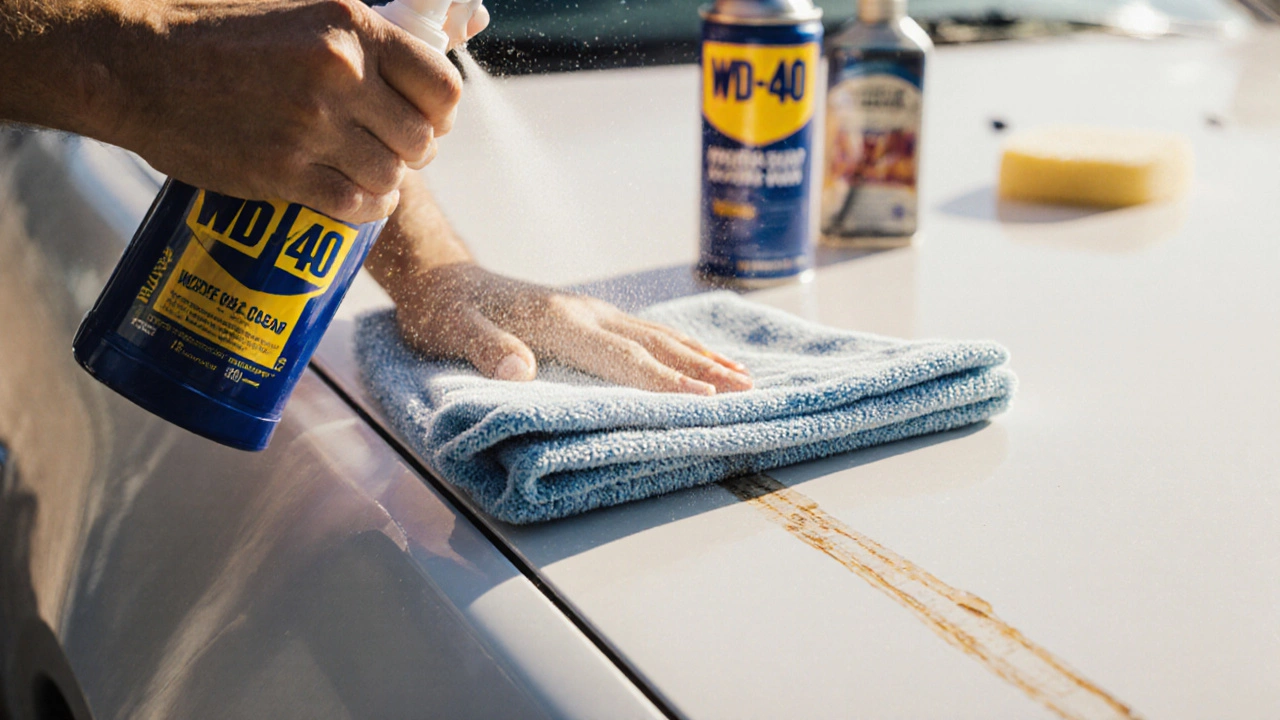
Step‑by‑step: Using WD-40 for minor scratches
Follow these steps to get the best results without damaging the clear coat.
- Clean the area: Use a mild automotive soap and a microfiber towel to remove dust, brake dust, and any existing wax. Let the surface dry completely.
- Test in a hidden spot: Spray a tiny amount on an inconspicuous part of the panel to ensure the finish doesn’t react oddly.
- Apply WD-40: Hold the can about 6‑8 inches away and spray a light mist directly onto the scratch. Use a clean microfiber cloth to spread the spray evenly, working in the direction of the scratch.
- Buff the surface: After 30 seconds, take a fresh, dry microfiber towel and buff the area with gentle circular motions. The goal is to disperse excess oil and create a uniform sheen.
- Re‑evaluate: Step back and view the panel from different angles. If the scratch still stands out, repeat the process once more, but avoid over‑coating.
- Seal the work: Once you’re satisfied, apply a light coat of car wax or a paint sealant. The wax will trap any remaining oil and protect the clear coat from the solvent’s mild abrasive nature.
Remember, this method works best on scratches that are less than 20 microns deep - essentially, surface‑level scuffs that have not penetrated the clear coat.
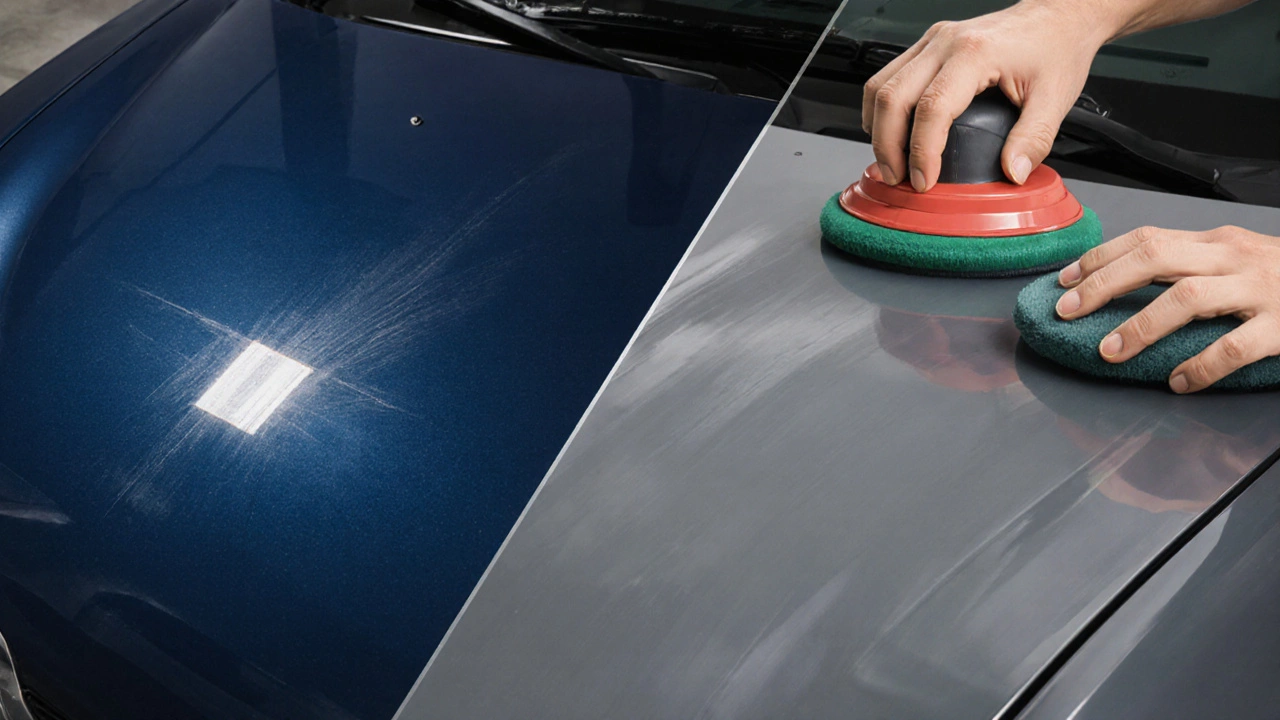
When WD-40 isn’t enough
If the mark feels rough to the touch, catches your fingernail, or shows a stark color difference, the scratch likely reaches the mid‑coat or base coat. In those cases you’ll need a more aggressive approach:
- Polishing compound: A mild abrasive that can level the clear coat around the scratch, blending it with the surrounding paint.
- Touch‑up paint: Matching the exact factory color, applied with a fine brush or pen.
- Professional spray‑in‑can kits: Products that combine a filler, adhesive, and clear coat in one step.
These solutions often require a wet‑sanding step, a polishing step, and a final seal. They are more time‑consuming but give a lasting repair.
Comparison: WD‑40 vs. Dedicated Scratch Removers
| Product | Primary Function | Depth Effective | Durability | Ease of Use |
|---|---|---|---|---|
| WD-40 | Lubricant & temporary mask | 0‑20 µm (clear‑coat only) | Days to weeks (wash‑off) | Very easy - spray & wipe |
| Meguiar’s Scratch Remover | Light abrasive polish | 0‑40 µm (clear‑coat & shallow mid‑coat) | Weeks to months (protected by wax) | Easy - apply, buff, wipe |
| 3M Paint Scratch Fix | Filler + clear‑coat blend | Up to 100 µm (mid‑coat depth) | Years (once cured) | Moderate - mix, spray, cure |
From the table you can see why WD‑40 is often called a “quick‑look” fix. It shines when you need a temporary visual improvement, but it doesn’t replace a proper polish or filler for deeper damage.
Common pitfalls and how to avoid them
- Over‑spraying: Too much oil can leave a greasy film that attracts dust.
- Skipping the wash: Dirt trapped under the oil can cause micro‑scratches when you later buff.
- Neglecting wax: Wax not only protects the finish but also locks in the oil, extending the mask effect.
- Using on matte finishes: The oily sheen will stand out on flat paints, making the scratch more noticeable.
Apply the spray sparingly, always clean first, and finish with a protective layer. Those habits keep your car looking sharp while you decide whether a permanent repair is worth the effort.
DIY‑friendly alternatives for temporary scratch hiding
If you run out of WD‑40 or prefer a product without petroleum solvents, consider these options:
- Silicone spray: Provides a similar oily film but dries to a clearer finish.
- Automotive liquid polish: A thin abrasive that can blend surface scratches without deep sanding.
- Home‑made paste: Mix a drop of baby oil with a pinch of baking soda; dab onto the scratch and buff.
All of these work on the same principle-fill the groove and change the way light reflects.
Putting it all together: A quick‑decision flow
Use this simple flowchart the next time you spot a mark on your hood:
- Is the scratch visible only from a low angle? Yes → Try WD‑40.
- Does it feel rough or catch a fingernail? Yes → Move to polishing compound.
- Is the color noticeably different? Yes → Use touch‑up paint or filler.
- Do you plan to sell the car soon? Yes → Professional repair for best resale value.
This mental checklist helps you choose the right level of effort without over‑committing.
Frequently Asked Questions
Can WD‑40 damage my car’s clear coat?
Used sparingly and wiped off promptly, WD‑40 won’t harm a modern clear coat. Prolonged exposure or heavy application can soften the resin, so always follow up with a wax seal.
How deep must a scratch be before WD‑40 is useless?
If a scratch can be felt with your fingernail-roughly 20‑30 µm deep-it’s beyond the reach of a temporary oil mask. You’ll need a light abrasive polish or a filler at that point.
Will WD‑40 work on matte or satin paint finishes?
Because the spray leaves a shiny film, it often stands out on flat paints. For matte finishes, silicone‑based products give a clearer hide without the gloss.
How many times can I re‑apply WD‑40 on the same spot?
You can re‑apply as needed, but each layer adds more oil that must be removed before polishing. Over‑application may attract dirt, leading to new micro‑scratches.
Is there a professional product that works like WD‑40 but lasts longer?
Products such as 3M Paint Scratch Fix combine a filler with a clear‑coat resin, giving a permanent repair that looks similar to a polished surface.
Got more questions? Drop a comment below and we’ll help you sort out the best approach for your car’s finish.